
Requirements for Installation.
安裝要求。
In order to install CyberPanel, you need to ensure that you meet the following requirements.
為了安裝 CyberPanel,您需要確保滿(mǎn)足以下要求。
- Server with fresh installation of?Ubuntu 18.04, Ubuntu 20.04, AlmaLinux 8,?AlmaLinux?9, Ubuntu 22.04,?CloudLinux 8.
全新安裝?Ubuntu 18.04、Ubuntu 20.04、AlmaLinux 8、AlmaLinux?9、Ubuntu 22.04、CloudLinux 8?的服務(wù)器。 - 1024MB RAM, or higher??1024MB RAM 或更高
- 10GB Disk Space??10GB 磁盤(pán)空間
CyberPanel?with?CyberPanel Ent
Cyber Panel?與?Cyber Panel Ent
CyberPanel is exactly the same in both versions. The only distinction lies in the choice of web server running in the back-end.
Cyber Panel 在兩個(gè)版本中完全相同。唯一的區(qū)別在于選擇在后端運(yùn)行的 Web 服務(wù)器。
- CyberPanel?normally comes with OpenLiteSpeed and it is completely free for an unlimited number of domains (You can host unlimited domains) and work processes.?
Cyber Panel?通常帶有 OpenLiteSpeed,并且對(duì)于無(wú)限數(shù)量的域(您可以托管無(wú)限的域)和工作流程是完全免費(fèi)的。 - CyberPanel?Enterprise?comes with LiteSpeed Web Server Enterprise and it is free for one domain and if you want for multiple domains you can get different plans according to your needs on the?Pricing page. The CyberPanel License includes the price of the Litespeed Enterprise license.
Cyber PanelEnterprise?附帶 LiteSpeed Web Server Enterprise,一個(gè)域是免費(fèi)的,如果您想要多個(gè)域,您可以在定價(jià)頁(yè)面上根據(jù)您的需要獲得不同的計(jì)劃。Cyber Panel 許可證包括 Litespeed Enterprise 許可證的價(jià)格。
To learn more about?Open Litespeed?and?Litespeed Enterprise?please check this comprehensive?comparison.
要了解有關(guān)?Open Litespeed?和?Litespeed Enterprise?的更多信息,請(qǐng)查看此綜合比較。
Let’s proceed with the installation.
讓我們繼續(xù)安裝。
The CyberPanel installation process is straightforward and can be completed by following the provided instructions.
Cyber Panel 安裝過(guò)程很簡(jiǎn)單,可以按照提供的說(shuō)明完成。
- Step 1:?Connect to the server via SSH client.?(Putty,?Bitvise SSH client, etc)
第 1 步:通過(guò) SSH 客戶(hù)端連接到服務(wù)器。(Putty、Bitvise SSH 客戶(hù)端等)
First login to your server through SSH client as a Root user (Sudo will not work). You can get the Login details from your web host.
首先以 Root 用戶(hù)身份通過(guò) SSH 客戶(hù)端登錄您的服務(wù)器(Sudo 將不起作用)。您可以從您的虛擬主機(jī)獲取登錄詳細(xì)信息。 - Step 2:?Update server Packages.
第 2 步:更新服務(wù)器軟件包。
Update your server OS first (Because it updated overall services because it provides much better compatibility). Run this command
首先更新您的服務(wù)器操作系統(tǒng)(因?yàn)樗铝苏w服務(wù),因?yàn)樗峁┝烁玫募嫒菪裕_\(yùn)行此命令
For Ubuntu:??對(duì)于 Ubuntu:
For CentOS/Alma/Rocky:
對(duì)于 CentOS/Alma/Rocky:
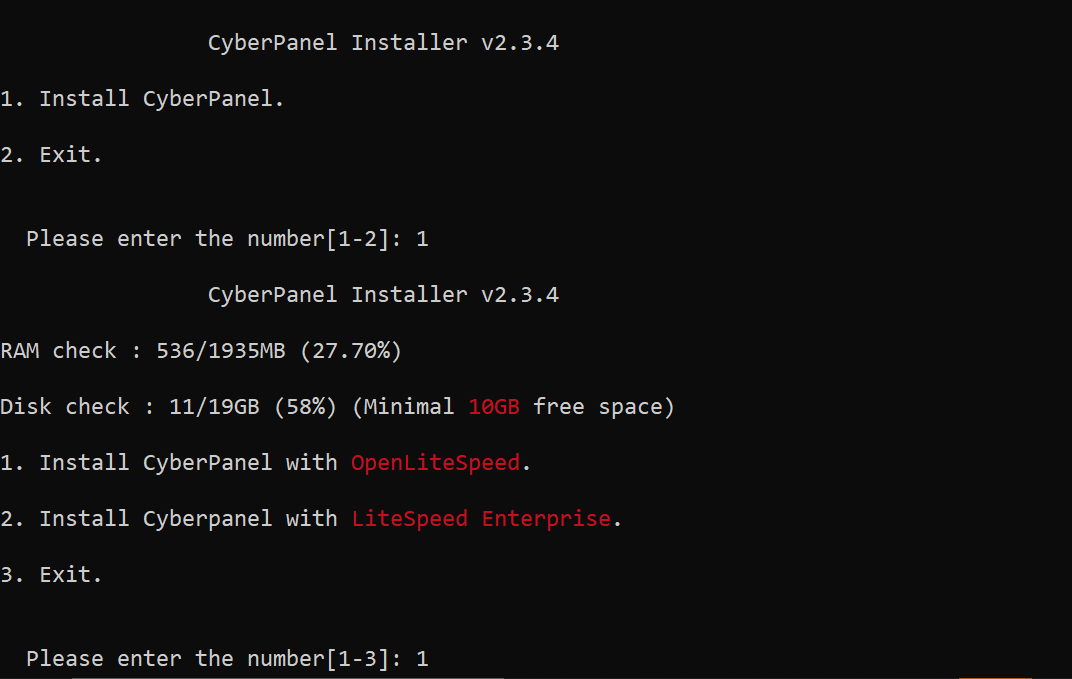
- Step 3:?Run the Installation Script.?Execute the provided command to initiate the automated installation script. This script will guide you through several decisions regarding the LiteSpeed version and additional add-ons you wish to install.
第 3 步:運(yùn)行安裝腳本。執(zhí)行提供的命令以啟動(dòng)自動(dòng)安裝腳本。此腳本將指導(dǎo)您完成有關(guān)您希望安裝的 LiteSpeed 版本和其他附加組件的幾個(gè)決定。
- For some reason, If you are not log in?as root user, Then use this below Script.
出于某種原因,如果您沒(méi)有以 root 用戶(hù)身份登錄,請(qǐng)使用下面的腳本。
- Step 4:?Select the version of LiteSpeed that you would like to use.
第 4 步:選擇您要使用的 LiteSpeed 版本。
As mentioned above in the?CyberPanel with?CyberPanel?Ent?Select which version of Litespeed You want to Install. If you select Litespeed Enterprise, Please first ensure that you have got the license key. You can visit the?Pricing page?to get the required plan.
如上所述,在 Cyber Panel 中使用?Cyber PanelEnt?選擇要安裝的 Litespeed 版本。如果您選擇 Litespeed Enterprise,請(qǐng)首先確保您已獲得許可證密鑰。您可以訪(fǎng)問(wèn)?定價(jià) 頁(yè)面以獲取所需的計(jì)劃。
- If you select LiteSpeed Enterprise, you will see the following prompt. Enter your serial number
如果您選擇 LiteSpeed Enterprise,您將看到以下提示。輸入您的序列號(hào)
If you do not have any license, you can also use a trial license (if the server has not used a?trial license before), type TRIAL
如果您沒(méi)有任何許可證,您也可以使用試用許可證(如果服務(wù)器之前沒(méi)有使用過(guò)試用許可證),鍵入 TRIAL
Please input your serial number for LiteSpeed WebServer Enterprise:
請(qǐng)輸入您的 LiteSpeed WebServer Enterprise 序列號(hào): - Step 5:?Select Services and Packages.
第 5 步:選擇 Services and Packages。
You will encounter a sequence of prompts offering various options and add-ons for selection.
您將遇到一系列提示,其中提供了各種選項(xiàng)和附加組件以供選擇。
–?Full Service (default Y):
– 全方位服務(wù)(默認(rèn) Y):
PowerDNS?– an open-source DNS server
PowerDNS?– 開(kāi)源 DNS 服務(wù)器
Postfix?– open-source mail transfer agent
Postfix?– 開(kāi)源郵件傳輸代理
Pure-FTPd?– open-source FTP server
Pure-FTPd?– 開(kāi)源 FTP 服務(wù)器
–?Remote MySQL (default N):
– 遠(yuǎn)程 MySQL(默認(rèn) N):
Allow for your Database to be installed on a remote server
允許將數(shù)據(jù)庫(kù)安裝在遠(yuǎn)程服務(wù)器上
- –?Remote MySQL (default N):
– 遠(yuǎn)程 MySQL(默認(rèn) N):
Allow for your Database to be installed on a remote server
允許將數(shù)據(jù)庫(kù)安裝在遠(yuǎn)程服務(wù)器上
–?CyberPanel Version (default Latest Version):
– Cyber Panel 版本(默認(rèn)最新版本):
You can choose to install a previous version of CyberPanel, or press Enter to install the latest version.
您可以選擇安裝舊版本的 CyberPanel,或按 Enter 鍵安裝最新版本。
–?Password (default “1234567”):
– 密碼(默認(rèn)“1234567”):
Using the default password is?not advisable. It is recommended to set a?strong?password of your own by choosing ‘s’ or generate a?random?password by selecting ‘r’. After the installation, you will see the password prompt displayed on the screen.
不建議使用默認(rèn)密碼。建議通過(guò)選擇 's' 來(lái)設(shè)置自己的強(qiáng)?密碼,或者通過(guò)選擇 'r' 來(lái)生成隨機(jī)?密碼。安裝后,您將在屏幕上看到密碼提示。
–?Memcached (default Y):
–?Memcached(默認(rèn) Y):
Distributed memory object caching system
分布式內(nèi)存對(duì)象緩存系統(tǒng)
–?Redis (default Y):
–?Redis(默認(rèn) Y):
In-memory data structure store, used as a database, cache, and message broke
內(nèi)存數(shù)據(jù)結(jié)構(gòu)存儲(chǔ),用作數(shù)據(jù)庫(kù)、緩存和消息中斷
–?Watchdog (default Yes):
–?看門(mén)狗(默認(rèn)是):
A kernel watchdog is used to monitor if a system is running. It is supposed to automatically reboot hanged systems due to unrecoverable software errors
內(nèi)核監(jiān)視器用于監(jiān)視系統(tǒng)是否正在運(yùn)行。它應(yīng)該自動(dòng)重啟由于不可恢復(fù)的軟件錯(cuò)誤而掛起的系統(tǒng) - Step 6: Installation Processing
第 6 步:安裝處理
The installation process will initiate automatically and is expected to be complete within 5-10 minutes, depending on your server’s speed.
安裝過(guò)程將自動(dòng)啟動(dòng),預(yù)計(jì)在 5-10 分鐘內(nèi)完成,具體取決于您服務(wù)器的速度。 - Step 7: Finalize Installation
第 7 步:完成安裝
Upon completion of the installation process, you will encounter a screen displaying important information regarding your configuration. It is recommended to select and securely copy this information to a safe location for future reference.
安裝過(guò)程完成后,您將看到一個(gè)屏幕,其中顯示有關(guān)您的配置的重要信息。建議選擇此信息并將其安全地復(fù)制到安全位置以備將來(lái)參考。


評(píng)論